Finding and Running Models
In this section, we will explore how to find and run pre-trained models for inference using sites like PyTorch Hub and Tensorflow Hub. We will also discuss how to use the transformers library to load models from Hugging Face. After completing this section, you should be able to:
Find and load pre-trained models from PyTorch Hub and Tensorflow Hub.
Use the transformers library to load and run models from Hugging Face.
Setup
To run the code examples in this section, you will need to open a Jupyter Notebook on the TACC Analysis Portal using the Vista compute cluster.
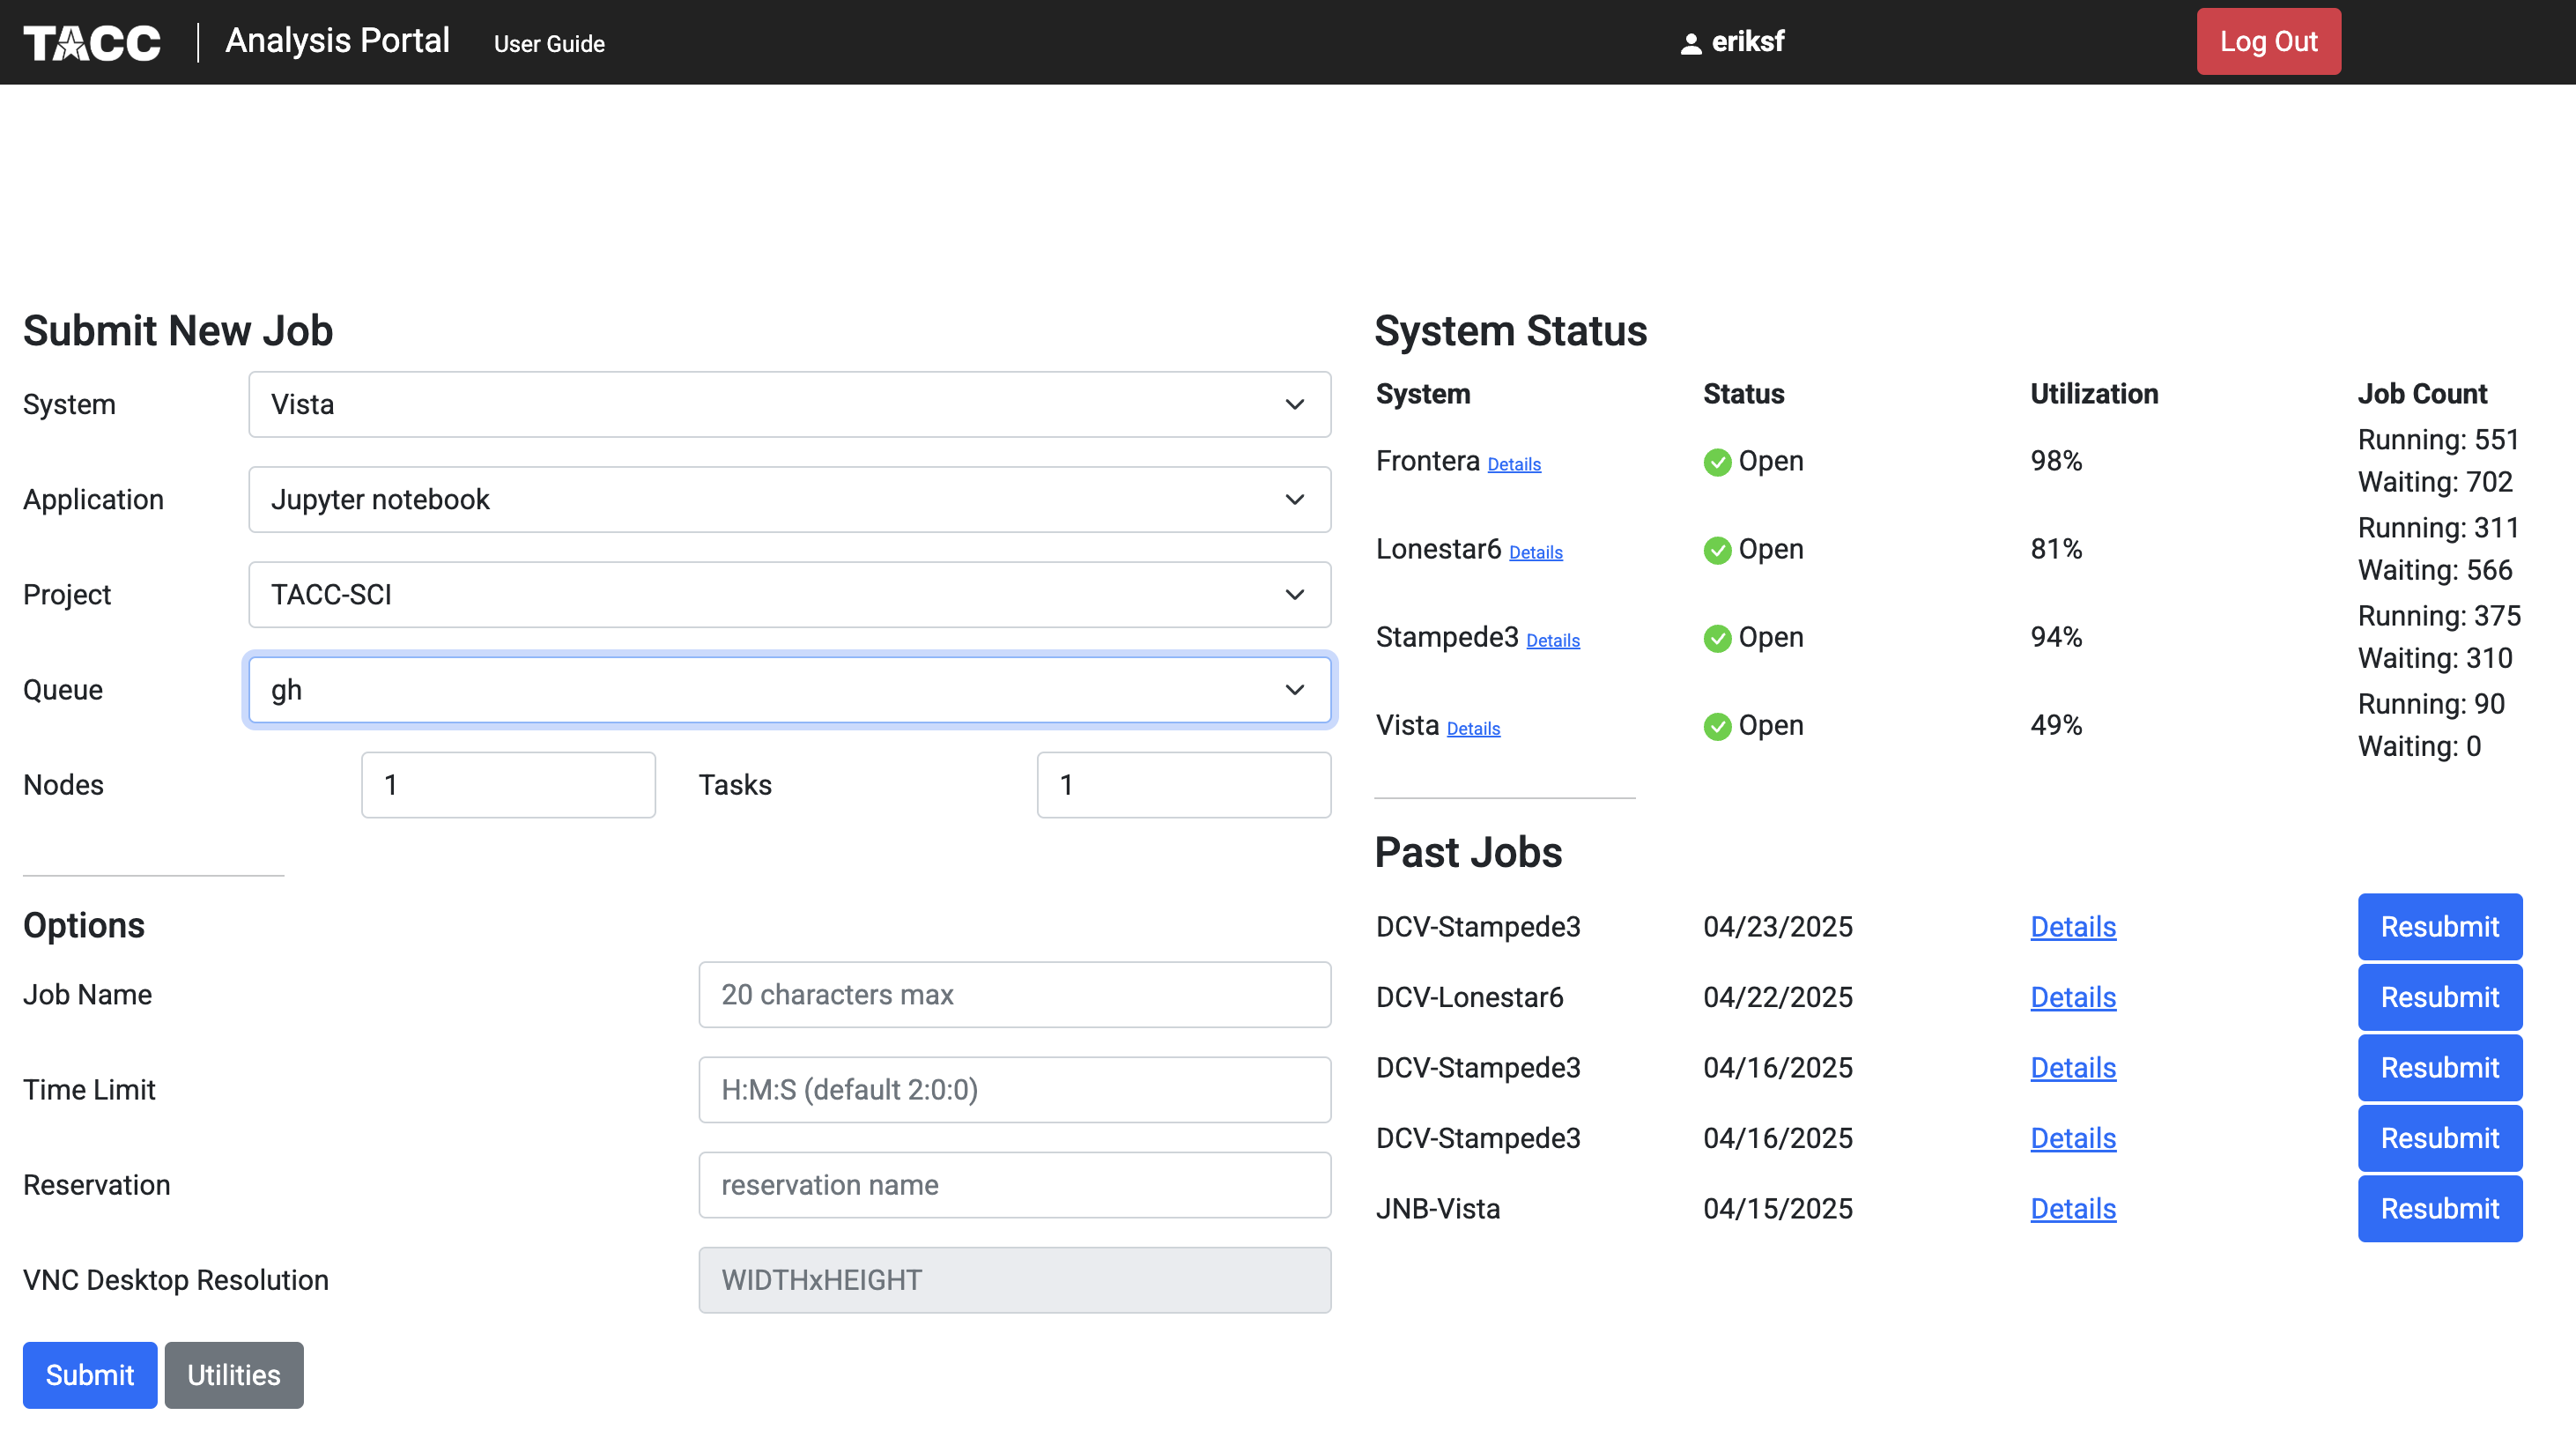
TACC Analysis Portal.
Tensorflow Hub
Tensorflow Hub is a library for publishing, discovering, and consuming reusable parts of machine learning models that is open to community contributors. It provides a collection of pre-trained models that can be easily integrated into Tensorflow applications. To use Tensorflow Hub, you need to install the library. You can do this using pip:
[vista]$ pip install --user tensorflow-hub
We’re going to use the MobileNet_V2 model from Tensorflow Hub. This model is a lightweight deep learning model that is designed for mobile and embedded vision applications. It is a popular choice for image classification tasks and is known for its speed and accuracy. The model is pre-trained on the ImageNet dataset.
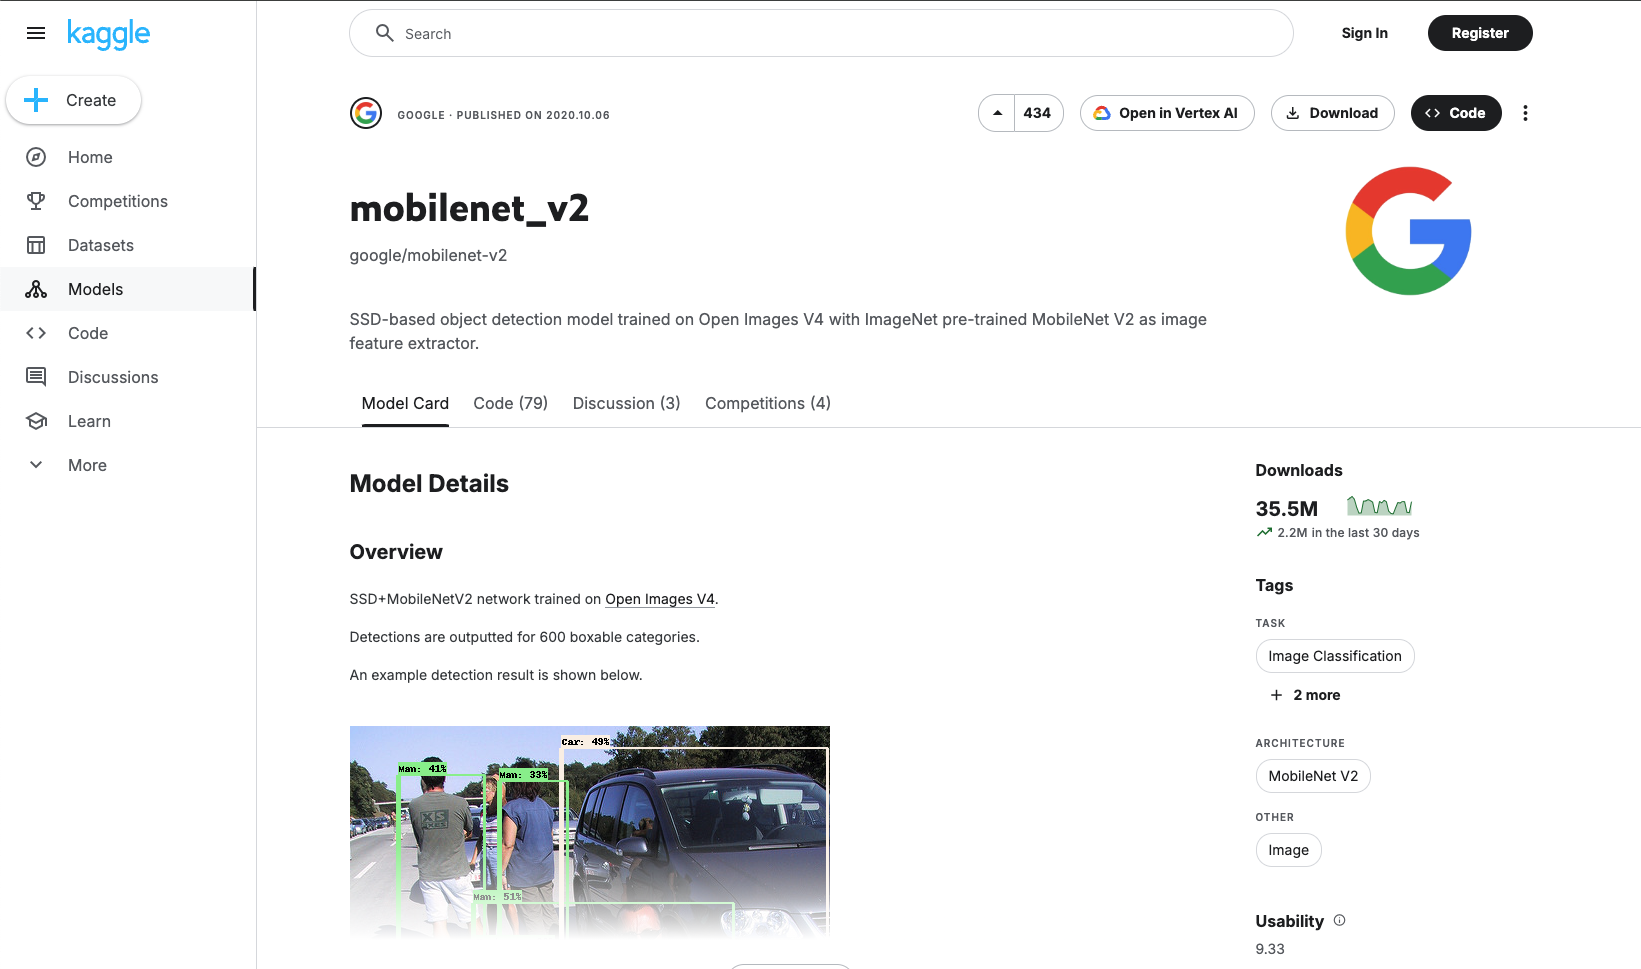
The mobilenet_v2 model card at Tensorflow Hub/Kaggle.
The model card provides information about the model, including its architecture, input and output formats, variations, and usage examples. We’re going to use the Tensorflow 2 tf2-preview-classification variation to do a simple image classification task.
First, we will need to import tensorflow, tensorflow_hub, and a few other libraries needed for this task:
>>> import tensorflow as tf
>>> import tensorflow_hub as hub
>>> import numpy as np
>>> from PIL import Image
Next, we will load the pre-trained model from Tensorflow Hub using information from the model card:
>>> # Load the pre-trained model from Tensorflow Hub
>>> model_url = "https://www.kaggle.com/models/google/mobilenet-v2/TensorFlow2/tf2-preview-classification/4"
>>> img_shape = (224, 224)
>>> classifier = tf.keras.Sequential([hub.KerasLayer(model_url, input_shape=img_shape+(3,))])
Now, we can use the model to classify an image. We will load an image from a URL, preprocess it, and then use the model to make a prediction:
>>> # Download image and compute prediction
>>> img_url = "https://upload.wikimedia.org/wikipedia/commons/b/b0/Bengal_tiger_%28Panthera_tigris_tigris%29_female_3_crop.jpg"
>>> img = tf.keras.utils.get_file("image.jpg", img_url)
>>> img = Image.open(img).resize(img_shape)
>>> img = np.array(img) / 255.0
>>> result = classifier.predict(img[np.newaxis, ...])
Finally, we’ll map the prediction to a corresponding class label and print out the predicted class name:
>>> # Map the prediction result to the corresponding class label
>>> labels_url = "https://storage.googleapis.com/download.tensorflow.org/data/ImageNetLabels.txt"
>>> predicted_class = tf.math.argmax(result[0], axis=-1)
>>> labels_path = tf.keras.utils.get_file("ImageNetLabels.txt", labels_url)
>>> imagenet_labels = np.array(open(labels_path).read().splitlines())
>>> predicted_class_name = imagenet_labels[predicted_class]
>>> print(f"Predicted class name: {predicted_class_name}")
PyTorch Hub
PyTorch Hub is a pre-trained model repository designed to facilitate research exploration. It provides a simple and efficient way to load pre-trained models and use them for inference and fine-tuning. To use PyTorch Hub, you need to install the library. You can do this using pip:
[vista]$ pip install --user torch torchvision
In the previous section, we built a Transfer learning example that used the pre-trained ResNet18 model from PyTorch Hub as a starting point.
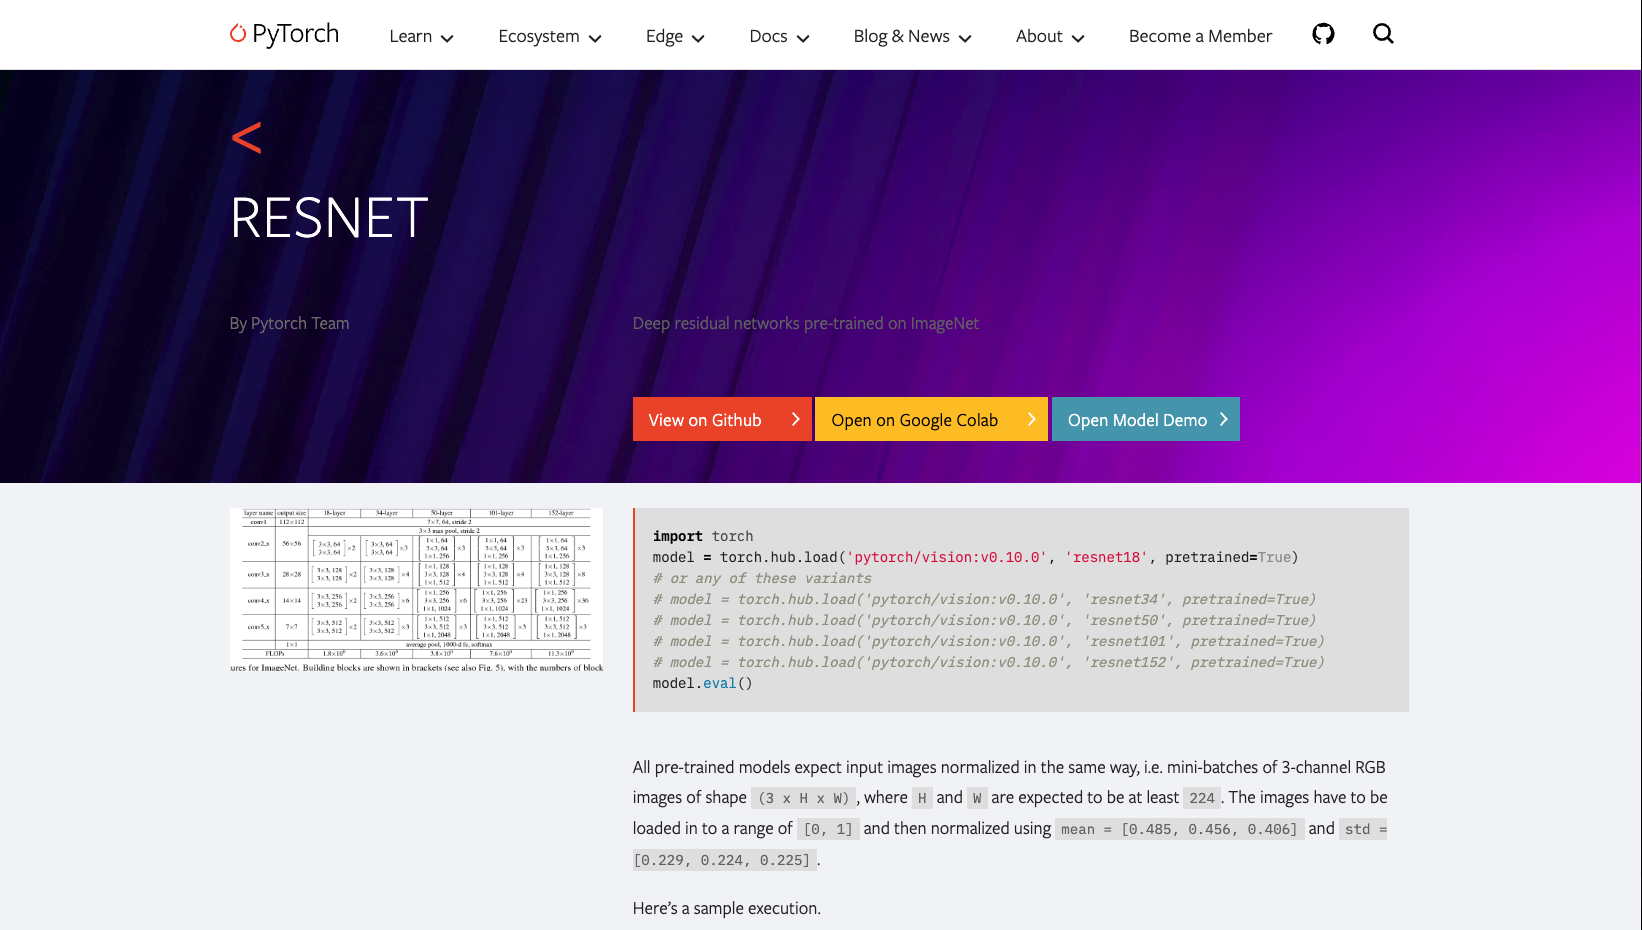
The ResNet model card at PyTorch Hub.
We don’t need to repeat the example here, but we will show the relevant parts on how to load the model. Since this was a computer vision problem, we were able to use the torchvision library to load the pre-trained model. The torchvision library provides a collection of pre-trained models for computer vision tasks, including image classification, object detection, and segmentation. To load the pre-trained ResNet18 model, we can use the following code:
>>> import torch
>>> from torchvision import models

>>> # Load the pre-trained ResNet18 model from PyTorch Hub
>>> model = models.resnet18(weights='IMAGENET1K_V1')
Hugging Face Transformers
The transformers library from Hugging Face provides a collection of pre-trained models for natural language processing (NLP) tasks, including text classification, named entity recognition, and question answering as well as for other tasks such as Computer Vision, Multimodel (multiple types of data), and Audio. The library also provides a simple and efficient way to load pre-trained models and use them for inference and fine-tuning.
Brief Introduction to Transformers
Transformers are a type of neural network architecture that has become the de facto standard for NLP tasks. They are based on the self-attention mechanism, which allows the model to weigh the importance of different words in a sentence when making predictions. This allows transformers to capture long-range dependencies and contextual information in text data. The transformers library provides a collection of pre-trained models that are based on the transformer architecture, including BERT [1], GPT-2 [2], and RoBERTa [3]. These models have been pre-trained on a large corpus of text and can be fine-tuned for specific tasks with relatively small amounts of task-specific data.
Timeline of NLP and Transformers
Transformers fit into the family of Natural Language Processing (NLP) models that have been developed over the years, starting with simple models like Bag of Words [4] and Word2Vec [5], and moving on to more complex models like BERT, GPT, and the newest Large Language Models (LLM).
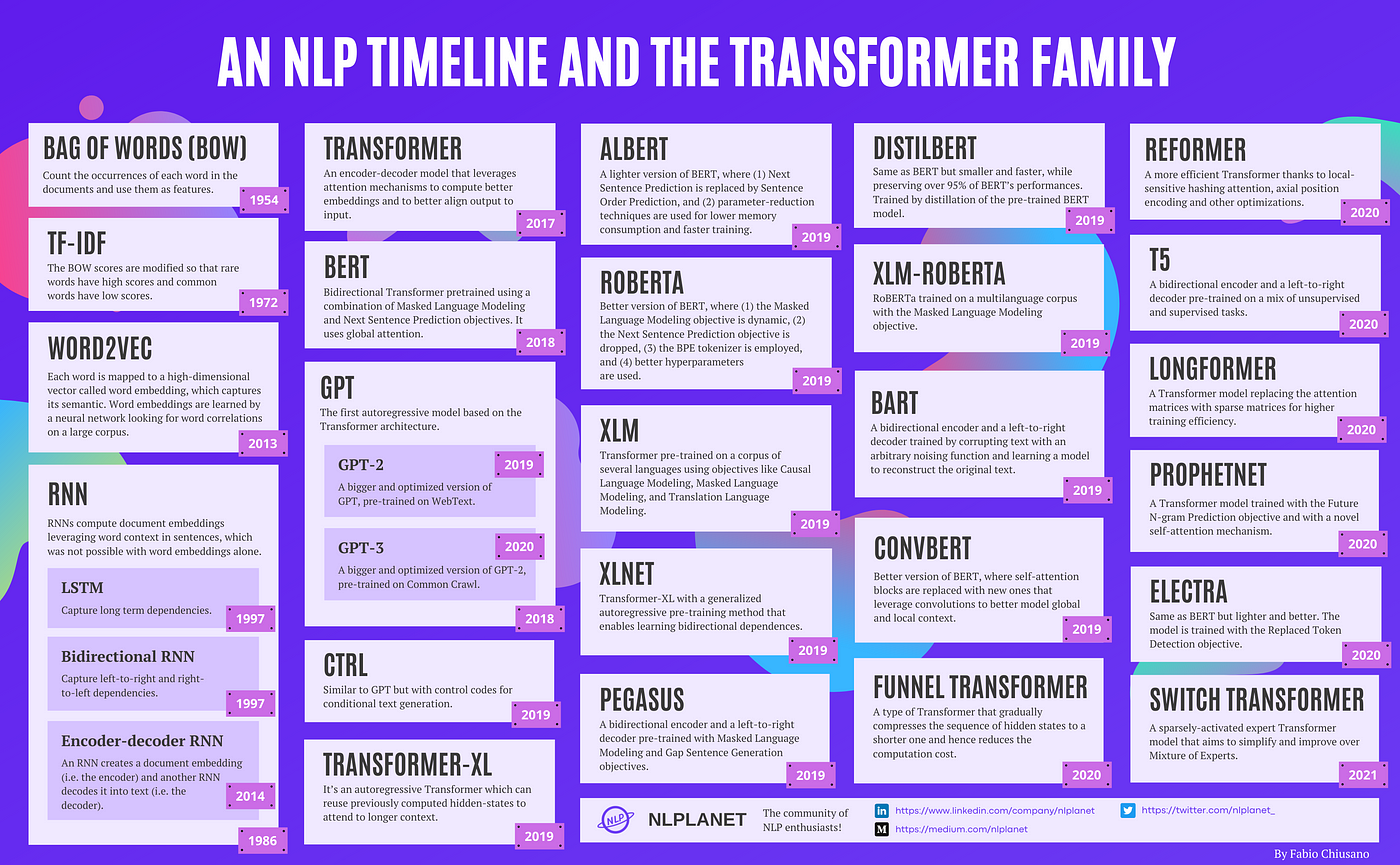
Timeline of NLP models. Source: A Brief Timeline of NLP from Bag of Words to the Transformer Family.
And because the strategy to increase the performance of these models is to increase the size of the model, the trend is to have larger and larger models.
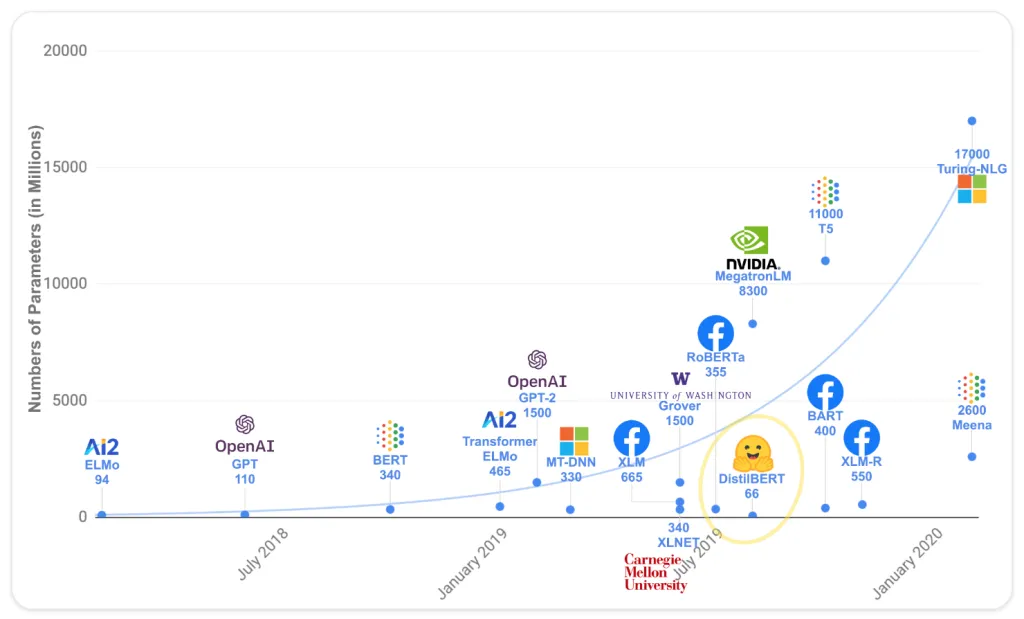
Size of Transformer models. Source: Hugging Face LLM Course.
Architecture
The transformer architecture is based on the self-attention mechanism, which allows the model to weigh the importance of different words in a sentence when making predictions. This is the key to the transformer architecture and was pointed out by the title of the paper introducing it, “Attention Is All You Need” [6]. The architecture consists of an encoder and decoder, each of which is made up of multiple layers. Each layer consists of a multi-head self-attention mechanism and a feed-forward neural network. The encoder processes the input text and generates a set of hidden states, which are then passed to the decoder. The decoder generates the output text based on the hidden states from the encoder and the previously generated output text. The self-attention mechanism allows the model to capture long-range dependencies and contextual information in the text data.
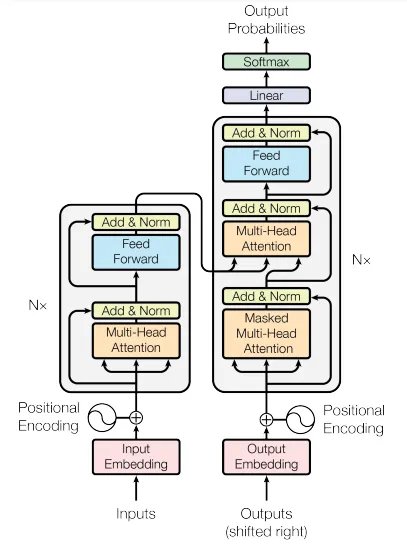
General Transformer architecture. Source: Attention Is All You Need.
There are three main variations of the transformer architecture and the different models that are based on it are specialized for different tasks:
Encoder-only models: These models are used for tasks that require understanding the input text, such as text classification and named entity recognition. Examples include BERT, DistilBERT, RoBERTa, and ModernBERT.
Decoder-only models: These models are used for tasks that require generating text, such as text generation, language modeling, and conversational AI. Examples include GPT-(1,2,3,4) and LLaMa.
Encoder-decoder models: These models are used for tasks that require both understanding and generating text, such as machine translation and summarization. Examples include T5 and BART.
Usage
To use the transformers library, you need to install the library. You can do this using pip:
[vista]$ pip install --user transformers
The most convenient way to use the transformers library is to use the Pipeline API. The Pipeline API provides a simple and efficient way to load pre-trained models and use them for inference and fine-tuning. The API supports a wide range of tasks, including text classification, named entity recognition, question answering, and text generation. The API automatically handles the preprocessing and postprocessing of the input and output data, making it easy to use pre-trained models without having to worry about the details of the model architecture and implementation.
We will first use a transformers pipeline to do a text summarization task based on a short article from GenomeWeb that we stored as a text file. Let’s import the necessary libraries:
>>> from transformers import pipeline
>>> import requests
Now we will grab the text file and store it as a string:
>>> url = "https://raw.githubusercontent.com/TACC/life_sciences_ml_at_tacc/refs/heads/main/docs/section4/files/genomeweb_story.txt"
>>> response = requests.get(url)
>>> text = response.text
>>> print(text)
Finally, we will load the summarization pipeline and use it to summarize the text:
>>> summarizer = pipeline("summarization", model="facebook/bart-large-cnn")

>>> summary = summarizer(text, max_length=150, min_length=50)
>>> print(summary)
The transformers pipeline also allows for more customization, such as specifying the model and tokenizer to use. For example, let’s switch to doing some sentiment analysis using the nlptown/bert-base-multilingual-uncased-sentiment model. This model was finetuned for sentiment analysis of product reviews in several languages. It predicts the review as a number of stars from 1-5. We’ll up the ante by specifying the “review” in another language, French. First, we will need to load in the required libraries and set the model name:
>>> from transformers import AutoTokenizer, AutoModelForSequenceClassification

>>> model_name = "nlptown/bert-base-multilingual-uncased-sentiment"
Next, we will load the model and tokenizer:
>>> model = AutoModelForSequenceClassification.from_pretrained(model_name)
>>> tokenizer = AutoTokenizer.from_pretrained(model_name)
Finally, we will use the model to predict the sentiment of a piece of French text:
>>> text = "La bibliothèque Transformers est fantastique."
>>> classifier = pipeline("sentiment-analysis", model= model, tokenizer=tokenizer)
>>> result = classifier(text)
>>> print(result)
Additional Resources
The material in this section is based on the following resources: